Ever since the release of the ‘No Step Back’ DLC, the META (most effective tactic available) for Hearts of Iron 4 division templates has been in flux. Whereas before, players had only to decide between one or two division templates to make the best division possible, now there is much more room for variation.
While I am happy to see the game add some strategic depth to give the player more options, it can also be a little confusing, especially for newer players, when trying to decide the best route to take.
In this article, I will give you what I believe are the best division templates and why I think so.
To repeat: After the NSB DLC, there really aren’t any division templates that are objectively ‘the best’. Each design has pros and cons. The best template for you will depend on the country you are playing and its current situation.
It allows you to play around with division composition. You can customize everything including tech level and doctrine. For this guide, I used 1940 tech (usually when the decisive fighting begins) and left the doctrine blank so as not to skew the stats for any battalion type.
Combat Width
Previously in HOI4 the ideal combat width for division templates was easy to decipher. As the combat width was 80, some multiple of 80 be it 40, 20, or 10, was desirable. Now, all that has changed. Combat width now varies depending on the terrain in which the battle takes place. (For a more in-depth look at terrain, be sure to check out our guide on land combat here. Hearts of Iron IV Tutorial Land Combat)
The game devs made sure that there was no one ‘perfect’ division width that would fit every terrain. Now players must settle for optimum width most of the time.
In my opinion, the most efficient width for divisions is 21. To get this number I simply looked at all of the terrain widths (except marshes, mountains, and hills) and picked the number that was divisible into each with the least remainder.
*I ignored marshes because they are rare and hills and mountains because only specialized mountaineer divisions should be fighting there. More on that later.
Taking attacks and additional attacks, which add width, into account, 21-width divisions and 42-width divisions are the ones with the least ‘wastage.’
To demonstrate, I will provide an example. Forest tiles have a combat width of 84 with an additional attack direction adding another 42 for a total of 126. 84/21 = 4 remainder 0 for 0 ‘wasted’ width. 126/21= 6 remainder 0 for 0 wasted width.
Thus for forest tiles, a 21-width division is perfectly optimum with zero wasted frontage.
Below is a table that shows how much combat frontage is wasted by some popular division widths.
Terrain
18-Width
21-Width
27-Width
33-Width
42-Width
44-Width
Plains & Desert 90/135
0+9 = 9
6+9 = 9
9+0 = 9
24+3 = 27
6+9 = 15
2+3 = 5
Forest & Jungle 84/126
12+0 = 12
0+0 = 0
3+18= 21
18+27 = 45
0+0 = 0
40+38 = 78
Urban 96/128
6+2 = 8
12+2 = 14
15+20 = 35
30+29 = 59
12+2 = 0
8+40 = 48
Total Wasted Width
29
23
65
131
15
131
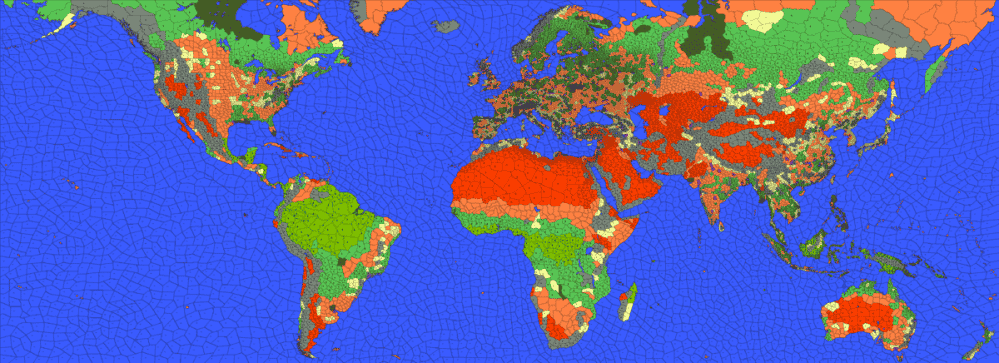
Terrain /width map
The clear winner from the table is the 42 width division with only 15 combat width wasted across all terrain types (except mountains, hills, and marshes).
So why do I recommend 21-width divisions as opposed to 42’s? Simple. Support companies.
Support companies in HOI4 act as force multipliers. They are a way to add modifiers or raw combat power to your divisions without taking up any combat width. This in essence makes them ‘free’ combat power (other than their IC cost of course).
I can field 2 21-width divisions for every 1 42-width division for the same cost in manpower. This means twice the benefits from support companies!
Additionally, while stacking breakthrough and defense in large divisions was the META before, with the addition of the coordination mechanic in NSB, it is no longer decisive.
Support Companies
Hearts of Iron 4 allows you to include up to 5 support companies in a division. Below, I will give you what I believe are the 4 most essential. The fifth slot is left open intentionally in order to be flexible depending on what country you are playing or situation you are in etc.
Support Artillery – Support artillery is a great support company because it adds a significant amount of soft attack, which is the most useful combat stat for a division. Adding soft attack without taking up any additional combat width is always a win in my book.
Engineers – Engineers are the premiere force multiplier company. They give entrenchment bonuses as well as bonuses for defensive battles for many different terrain types. They are simply too good to pass up.
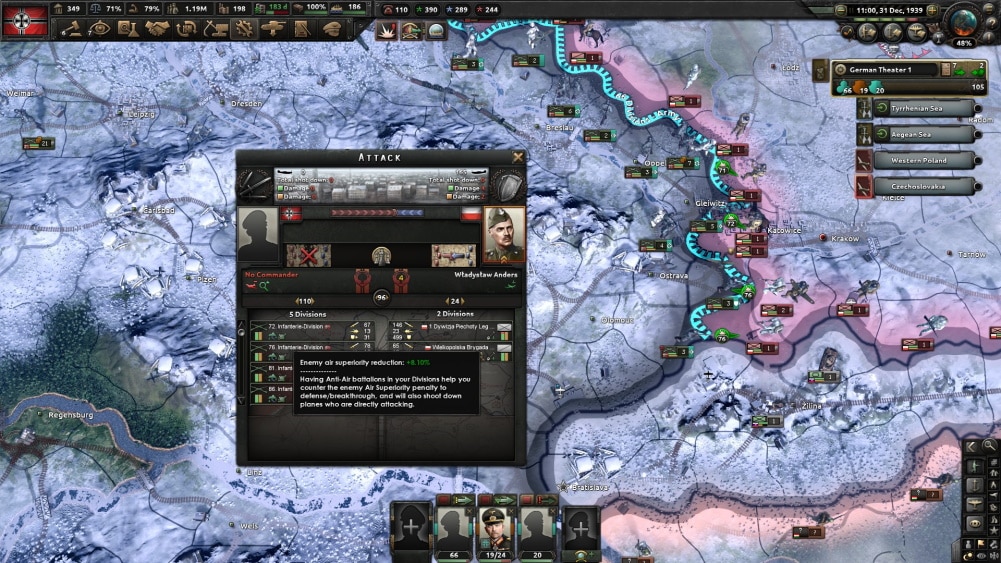
Support Anti-Air – Support AA adds a fair amount of piercing and hard attack which can be especially useful for infantry divisions as it may be the difference between piercing enemy armor or not. Shooting down enemy CAS with their air attack is also a nice bonus that trades well as far as IC costs are concerned.
Logistics – Logistics is basically mandatory after the NSB update. Reducing the total supply cost of the division allows for more divisions to be present in a given sector of the front. A literal force multiplier.
Empty – As stated, the fifth and final slot could be filled by a number of options depending on your country and situation. The following are decent choices.
Support rocket artillery is great for the same reasons that support artillery is but it does require some research.
Maintenance is useful if you are playing as a country with a weaker industrial base say Italy or France. Reduced equipment attrition and more captured enemy equipment means it more than pays for itself IC-wise.
Light flame tanks are a popular choice for tank divisions for the extra breakthrough. Although, do remember that if your tank division already has more breakthrough than the enemy has attack, it is a wasted stat.
Finally, I like recon. Many others write off recon as it has negligible if not negative benefits as far as direct combat is concerned. However, that’s not why I get it. The speed bonus it gives to your division (especially armored car recon) when combined with other speed bonus buffs (looking at you Mobile Warfare Doctrine) can be significant. And remember the military maxim “Get there firstest with the mostest!”
For most countries hospitals, MP, and signals aren’t really worth it simply due to the opportunity cost of not selecting the support companies mentioned above.
Infantry Division
10 Infantry, 1 Anti-Air; 21-width.
This infantry division is similar the standard ‘10/0’ infantry division. The only difference is the added anti-air battalion which adds a fair amount of piercing, hard attack, and air attack for a small increase in IC and manpower cost. It also makes the division have 21 width which, as we discussed, is important.
The infantry division’s job is mostly to hold ground against attack whether from other infantry or armor. This division’s high defense and organization allows it to do just that.
Infantry Division
Tank Division
4 Medium Armor, 6 Motorized-Infantry, 1 Motorized Anti-Air; 21 width.
The tank division’s job is to breach an enemy’s line and then exploit the breakthrough to create encirclements. (check out our guide for creating encirclements here Link to encirclement article). To do this, it needs to have high breakthrough, high speed, high soft attack and as much hardness and armor as possible.
The tanks give it breakthrough and make it hard, the motorized-infantry make it have enough HP and organization to give it some staying power in combat, and the motorized AA makes it 21 width.
When you have the tech and industry, I recommend you upgrade the motorized-infantry to mechanized-infantry. This will increase the attack and most importantly, the hardness of the division.
Medium Tank Division
Mountaineer Division
10 Mountain Infantry; 20 width.
You may notice that I don’t use 21 width for my mountain divisions but rather 20. That is because as mountain divisions, they should ideally only be fighting in hills or mountains. 20-width is well-suited for this.
It is also important not to dilute the mountain and hill combat bonus the division gets by adding in other battalions.
Mountaineer divisions will do an excellent job at stopping anything trying to attack through mountains or hills.
While they do have more breakthrough than standard infantry, I do not recommend attacking with them even in their advantageous terrain for the simple reason that you should always try to avoid attacking through that kind of terrain. However, if there is no other way, then this is the division you want.
Mountain Division
Experiment!
These are the basic divisions that I use when I play Hearts of Iron 4. However, don’t just stop here. Experiment a little. Find out what works for you and the country you’re playing. Maybe you need more hard attack as France to stop German Panzers. Maybe you need more AA as Japan to help mitigate some of the overwhelming Allied air onslaught.
Hearts of Iron 4 is a game where the tactics and counter-tactics are constantly evolving. To remain set in your ways and stubborn, is to be eventually swept away by inevitable change.
Hearts of Iron IV is set during the Second World War. That war was a war of maneuver. Fast, armored divisions breaking through enemy lines to encircle and destroy enemy divisions was the basic strategy during this war, and for HOI4, it is no different. In order to maximize your army’s effectiveness, you should aim to create encirclements and avoid broad, slow-paced offensives like in the First World War. This guide aims to teach you the best way to do that.
In order to create encirclements in HOI4 you need to penetrate the enemy line, breakout from your penetration, envelop the enemy using pincers, and then defend and reduce the created pocket.
*A quick disclaimer; encirclements in HOI4 are notoriously difficult to achieve using the battle planner. Although the battle planner works reasonably well for broad offensives, for encirclements it is advised to use manual control.
Battle plans can and should still be used to get the planning combat bonus, but the player should handle actual control of the divisions.
Penetration
Picking the right location is the first step when trying to create an encirclement. Ideally, you want to penetrate the enemy line at a weak point. Plains tiles without rivers are ideal for this, as they offer no defensive bonuses to your enemy. Avoid starting a breakthrough against a mountain tile or large river if possible. Remember the basic strategy axiom “attack the enemy where he is weak; avoid him where he is strong.”
To achieve penetration, you will need to use divisions which have a high breakthrough stat. It also helps to use hard, armored units to avoid high casualties when making the penetration. Tanks have a very high breakthrough stat as well as armor which makes them hard. Thus, they are ideally suited for the role of penetration. Some players also like to use divisions with high concentrations of artillery, but personally, I believe tanks are the best here.
High breakthrough helps these British Armored divisions with the initial penetration of the Italian line
When attacking to create a penetration, it is also often necessary to launch ‘pinning’ attacks adjacent to the chosen penetration point. This prevents the enemy from rushing reinforcements there, which would prevent or at least delay your breakthrough attempt.
The infantry attack to the North helps pin down Italian divisions that might try and reinforce my chosen penetration point.
Here we come to a doctrinal choice between large front and schwerpunkt. Large front doctrine (utilized by the Soviet Union) calls for attacks to be made across a fairly large section of the front (in HOI4 terms say 4-5 tiles). The idea is to confuse the enemy by making him unsure of which attack is the ‘actual’ one. Whichever attack achieves breakthrough first is then used as the focus of the offensive.
Schwerpunkt (utilized by the Germans) calls for maximum offensive power to be directed against a single point (in HOI4 terms 1 tile plus a few pinning attacks on the flanks). The idea here is to identify beforehand the weakest point in the enemy’s defenses and hit it as hard as you can to minimize casualties and the time it takes to achieve a penetration.
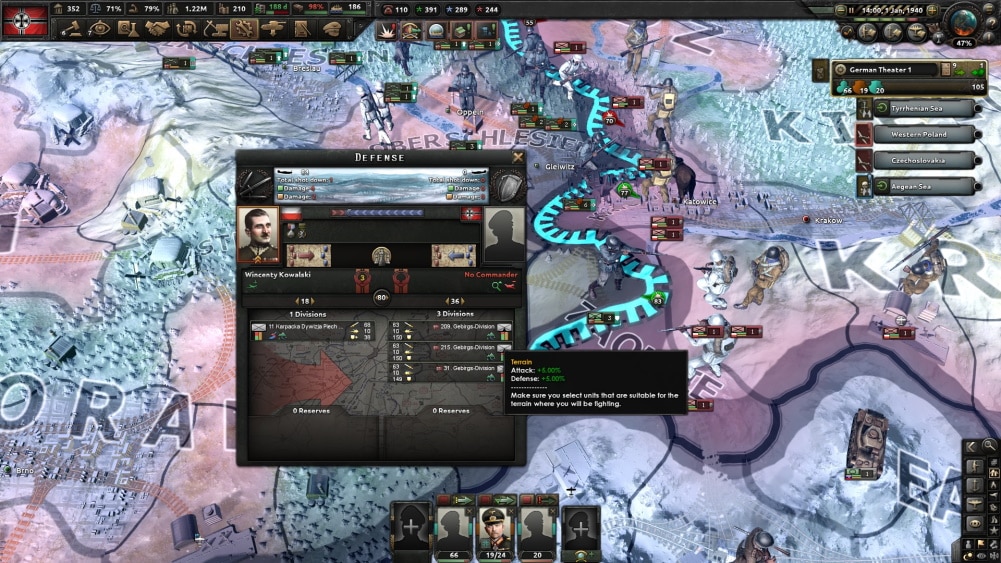
Schwerpunkt in effect. I have 10 German divisions concentrated against 2 Polish divisions in a single province.
Whichever doctrine you go with, you will want to provide your divisions with as much air support as possible to maximize their fighting efficiency. If the enemy has air superiority, your units will fight at reduced efficiency as well as suffer a movement speed penalty, which we will see is vital for the next phase of the battle.
Breakout
So you have cracked the enemy’s defensive line? Great! But your work has only just begun. Once you have achieved a penetration, you must then breakout. A breakout is a rush to the enemy’s rear using fast, exploitive units.
Speed is the most important attribute here. The faster your exploit divisions are the better. Keep in mind, your opponent will be doing everything they can to contain the penetration or counter-attack so you need to be quick and not get bogged down in combat.
This means that you cannot forget about logistics! Divisions that require fuel but have none will move at a snail’s pace. You must either capture enemy supply hubs in your line of advance or supply your divisions via air supply. (Remember that your air superiority level affects the air supply mission. This is another reason why it is so essential to achieve and maintain!)
Here you can see the importance of logistics. The poor supply caused by fighting in North Africa is really blunting my offensive.
Finally, as your units advance you should be ‘leaving a trail of divisions’ in order to defend the corridor that you are creating through enemy territory. If you fail to do this, you run the risk of having your spearhead units being cut of and encircled themselves.
Envelop
Envelopment is the surrounding of enemy units. Your breakout efforts should have been done in an intelligent way that lead to the envelopment of the enemy. Once the enemy is enveloped, he cannot retreat, reinforce, or resupply his units. This usually leads to their destruction.
There are single and double envelopments. Single envelopments are easier as they only require one ‘pincer’. However to be done, they need an ‘anvil’ to envelop against. The sea, impassable terrain, or a neutral 3rd country border can function as the anvil.
This was an attempt at a single envelopment. My plan was to break Italian lines in the desert and pin them against the sea at Masra Matruh.
Double envelopments are more difficult to pull off, as they require two pincers. However, they have the benefit of not needing any specific geography to achieve. The pincers act as the anvil for each other.
Poland’s geography is its weakness. It allows me to go for a large double envelopment with the aim of joining the pincers just west of Warsaw.
Choosing the right place for the entire attack here is crucial. You wouldn’t want one of your attack pincers to have to drive through marshes or mountains.
Defense and Reduction
Finally, you have enveloped the enemy. Outstanding! However, you don’t expect him to just write off those enveloped forces and sit on his hands do you? Of course not! He will try to break your envelopment by breaking out of or breaking into the pocket. You must defend your envelopment and seek to reduce it as soon as possible.
For the defense of an envelopment, I like to use motorized or mechanized infantry divisions. They have the speed to keep up with the tanks used during the breakout phase, but unlike armored divisions, they have a high defense stat which allows them to hold a line better.
Using a general with the ‘guerilla fighter’ trait is also helpful as it allows your divisions to entrench faster.
With a high defense stat, German motorized infantry is doing a terrific job at preventing the Polish divisions from breaking out of the encirclement.
Once your defensive lines around the pocket have stiffened sufficiently, it is time to start reducing the pocket. This is important for two reasons. 1) Your forces are quite vulnerable when spread thinly as when defending an encirclement. 2) There is often a disadvantageous economy of force at play when encircling. (i.e. you might be using 15 divisions to encircle 10, which means your opponent is likely stronger elsewhere on the front.)
Encirclements are great but it is best to reduce the pocket as quickly as possible. Here I have 33 German divisions against only 15 encircled Polish divisions. This is bad economy of force which could lead to problems elsewhere on the front.
When reducing the encirclement, attack the most accessible tiles first. Plains or tiles lightly defended by weak or exhausted units should be your priority. Your goal here is to drive the encircled units into an ever-shrinking space. In game terms, this has the advantage of forcing your opponent into situations where the stacking or encirclement penalty comes into play.
Once the pocket has been reduced enough, enemy divisions may begin to suffer encirclement or stacking penalties which significantly hamper combat efficiency.
Once the encirclement has been wholly reduced, your work is finished! Enjoy your victory and quickly reorganize your forces for another one!
Encirclements are essential if you are to defeat your opponent while expending minimum casualties and effort. The only alternative is using costly, broad WW1-based offensives, which will lose you the war or at the very least make victory much more expensive than it has to be.
Using paratroopers in Hearts of Iron 4 can be a tricky affair. It is something that many players struggle with or fail to understand completely. This mini guide aims to fix that. Below, we will go over the basics of using paratroopers in HOI4.
To use paratroopers in HOI4 you need to have researched the paratrooper tech, made an appropriate division template, trained that division, have transport planes, and finally perform the airdrop mission over your desired target.
The Tech
The paratrooper tech can be found in the ‘infantry’ tab in the tech tree. The first tech unlocks paratrooper battalions. Subsequent techs increase their damage and organization.
The tech that unlocks paratrooper battalions. When researched, it gives a free template as well.
The Template
Once you have researched the paratrooper tech, you will need to create an appropriate division template to use. After researching the first tech, you will get one for free that you can then modify. Remember that while you can add whatever support companies you want, adding any line battalions other than paratroopers will result in the loss of the ability for the division to paradrop.
Make sure that this tooltip is always checked. Otherwise your paratrooper division will not be able to perform its primary function.
The Training
Contrary to real life, paratrooper divisions in HOI4 require no special training. Simply queue them up in the ‘recruit tab’ as you would for any other division and wait for the training to complete.
Keep in mind, however, that paratroopers are considered Special Forces battalions, and as such, the number of them that you can train is limited by your nation’s Special Forces cap. To increase the cap, increase the overall number of divisions in your army.
The Logistics
Each transport plane can carry 2.0 units of weight. Each paratrooper battalion weighs .5. and each support battalion weighs .1.
If you do not have enough transport planes to carry the necessary weight, it means that they will have to make multiple trips to and from the drop zone. This means it will take longer to deploy your paratroopers.
This is not ideal because it gives the enemy more time to react. Additionally, it means your transport planes are in the air longer, thus increasing the chance that they will be shot down, causing significant losses to the paratroopers they are carrying.
So be sure to have enough transport planes to drop them all in one go!
The Execution
Once you have paradrop capable divisions trained and ready as well as transport planes produced and deployed, you are ready to go.
To launch a paradrop, simply put your paratroopers in an army, and select the ‘paradrop’ mission in the battle planner. Click on an airfield with transport planes and then click on the province where you want them to drop. Remember that you need to have at least 70% air superiority in all of the air regions from the takeoff point to the target.
Remember that the target must also be in range of your transport planes. So no dropping paratroopers across the Atlantic!
Using Paratroopers is as easy as clicking a few buttons in the battle planner.
Strengths & Weaknesses
Now that you know the basics of employing paratroopers in HOI4, let’s analyze some of their strengths and weaknesses.
Strengths
Using paratroopers allows you to potentially disrupt enemy movement along an axis of advance or retreat. Considering Paradox’s . . . . incredible AI, you can seriously mess with its ability to react appropriately when using paradrop.
With enough paratroopers, you could potentially get the AI to capitulate in a single day if there are enough unguarded VPs in range. This ‘strategy’ has been viable on and off throughout the game’s development so YMMV.
You can use paratroopers to cut off enemy retreat to complete encirclements faster. This, along with point 1, is the most ‘historical’ strength of paratroopers. When used correctly, you can ensure that no enemy divisions escape the pocket you have created for them.
Weaknesses
Cost. Paratroopers are very ‘expensive’ when you factor in everything you need to use them. They need their own research as well as the production of transport planes. That is research and production that isn’t going towards tanks or fighters or subs etc.
Additionally, there is the opportunity cost on your special forces. Every paratrooper battalion trained is one fewer mountaineer or marine battalion you can have. For some countries, it may not be worth the trade-off.
Paratroopers are highly fragile. They drop without any organization, meaning they can insta-surrender if an enemy unit touches them before they have had a chance to gain some org. This fragility means that they shouldn’t be dropped onto tiles with enemy divisions. Always look to drop onto undefended tiles. (For more info about organization and other stats related to land combat, check out our land powerguide here).
Dropping paratroopers directly into the teeth of enemy defenses is the easiest way to lose divisions.
As you can see, paratroopers are incredibly vulnerable right after the drop. Be sure to drop them far enough away from enemy divisions to give them a chance to recover some organization.
So there you have it. How to use paratroopers in Hearts of Iron IV. Paratroopers are very much a ‘high-risk, high-reward entity in the game. When used correctly, they can produce marvelous results. When used improperly, they can be disastrous.
Remember that in the game, unlike in real life, it might actually be advisable to “go a bridge too far.”
Attrition in Hearts of Iron 4 can be challenging to understand and deal with. The in-game tooltips don’t do a great job of explaining why it is happening, how you can prevent it, or even what it is. Well no more. This mini guide aims to fill in the gaps on attrition.
Attrition in Hearts of Iron 4 is the loss of equipment due to non-combat reasons. There are three types of attrition: supply attrition, terrain attrition, and weather attrition. Attrition does not cause a loss of manpower, only equipment.
Attrition Types
Supply attrition is dynamic and is shown by a small red skull on your division’s icon. It occurs when your divisions are undersupplied. Units can be undersupplied for many reasons, but it is usually due to having too many divisions in a given area or the area having poor infrastructure and railways.
To deal with supply attrition either remove divisions from the area or improve the logistical capability of the area by building higher level railways, naval bases or supply depots, and improving the infrastructure.
Additionally, adding the logistics support company to your divisions can make a big difference by reducing their supply draw requirement. Finally, field marshals with the supply wizard trait reduce the supply draw requirement for units under their command by 15%!
Terrain attrition is static and is shown by a small white skull on your division’s icon. There is nothing that can be done about terrain attrition other than avoiding fighting in tiles that have it. Certain terrain like marshes, deserts, jungles, and mountains have a substantial terrain attrition rate. You can check the attrition rate for each terrain type in our land combat guide here.
Weather effects like mud, deep snow, and extreme cold and hot can also cause attrition. Having troops that are acclimated to the climate as well as a commander with the ‘winter specialist’ trait help to reduce this. There is no commander trait to reduce attrition from extreme heat.
Other Factors Affecting Attrition
Reliability plays a factor in attrition as well. Simply put, the lower an equipment piece’s reliability is, the more of it you will lose to attrition when it is present. Conversely, equipment with higher reliability will suffer fewer losses in attritional situations.
Additionally, when it comes to attrition, you need to remember that the number of different equipment types for a division template and their max count matters.
The more different types of equipment a division requires, the more overall equipment losses it will suffer due to attrition. This is because of how the math works behind attrition calculation. The short of it is that minimum attrition losses usually get rounded up to 1. This means that having a wide variety of equipment types or having equipment types with low max counts tend to suffer proportionally higher losses from attrition.
Say you have an infantry division that needs 1,500 infantry kits and 36 artillery. If the division were in an attritional situation, it would lose a higher percentage of artillery than infantry kits due to rounding and minimum losses.
In summary, to minimize attrition in Hearts of Iron 4 keep units in supply, keep division templates as homogenous as possible, avoid fighting in difficult terrain and weather, and use equipment with high reliability.
That is attrition in Hearts of Iron 4 in a nutshell. While suffering attritional losses is inevitable in warfare, after reading this guide you should be able to keep them to a minimum.
Previously, we examined air power and its role as a force multiplier for your military. This time we are diving into the depths of naval power.
Naval Power in Hearts of Iron 4 is all about power projection. With sea dominance, you can threaten invasions, choke off trade, and/or protect your own lines of supply and communication.
While in the game, sea power isn’t quite as crucial as its real-life counterpart, it still plays a vital role and cannot be ignored. If playing as Great Britain or another maritime power, it is the most important aspect of the game.
In this part of the tutorial, we will discover what it takes to build and use a world-beating navy. We will look at the different ship types, the ship designer (assuming you have the Man the Guns DLC), mission explanations, a stat breakdown, as well as an overview of how naval combat works in the game.
Naval strategy is different from land and air strategy for one reason; building ships takes a very long time! Most Hearts of Iron 4 games start in 1936. This means you only have a little more than 3 years before the war breaks out if playing on historical. You must make a sober assessment of what your country’s naval requirements and capabilities are and get to work implementing them straight away. To do this most effectively, you need to know how to construct a navy.
Taken from the HOI4 wiki, you can see how long the build times are for capital ships. Planning is crucial!
Ship types
* If you own the Man the Guns DLC, the capabilities of all ships is mostly determined by the modules you use on the ship designer.
There are three basic types of ships in HOI4: capital ships, screening ships, and submarines. Let’s look first at capital ships. Capital ships are designed to meet the enemy ships in combat and sink them.
Super-Heavy Battleship (SHBB) – These are truly monsters of the waves. SHBB’s have serious firepower and armor protection. No other surface ship could hope to compete with them directly; however, they are still vulnerable to torpedoes and planes. The cost to build them is also massive requiring many resources and tying up dockyards for several years. They are also useful for shore bombardment. More on that later.
The Japanese super-heavy battleship Yamato is simply a beast on the waves.
Battleship (BB) – Battleships are powerful ships in their own right. While not as strong as SHBB’s, they take significantly fewer resources and time to build. Like their bigger brothers, they are powerful but slow and vulnerable to torpedoes and planes. They are also useful for shore bombardment.
Battlecruiser (BC) – Battlecruisers are the faster, smaller cousins of battleships. They keep most of the firepower of a BB, but trade armor protection for speed. The idea being that ‘they can outrun anything they can’t outshoot and outshoot anything they can’t outrun.’ Their lower armor means they can survive fewer hits, but their higher speed means that they are harder to hit in the first place.
Heavy Cruiser (CA) – Sometimes referred to as ‘the poor man’s battleship,’ heavy cruisers can still mount heavy batteries that are moderately powerful. They have the lightest armor of any capital ship, which reduces their survivability in combat against other capital ships. However, their speed is quite high which makes them difficult to hit. They are significantly cheaper and faster to build than other capital ships.
Carrier (CV) – Aircraft carriers in HOI4 are a bit of an enigma. In real life, they absolutely dominated the seas after 1941, but in game, they are effective but not dominant. The strength of a CV depends on the planes it carries and how many of them. We will talk about Carrier Task Force (CTF) composition later in the fleet composition section.
The ship itself has moderate speed for a capital ship, and light armor. Its build cost and time are less than BB’s but more than CA’s.
Adding additional hanger modules gives this US carrier the ability to carry more planes at the cost of increased production cost and slower overall speed
Now we move on to screening ships of which there are only two types. The primary role of screening ships is to protect capital ships from torpedo attacks and to attempt to penetrate the enemy ‘screen’ to attack their capital ships.
Light Cruiser (LC) – Light cruisers are a very versatile ship and one of my personal favorites. They have more survivability than their destroyer counterparts but much more attack and armor. They can be equipped with a plane catapult, which makes them excellent scouts for a fleet. While more expensive to build than destroyers, they are still quite cheap relative to capital ships.
Destroyers (DD) – Destroyers are the smallest, fastest, cheapest direct combat ship that can be built. They have low attack and armor but very high speed which makes them quite difficult to hit. If you load them up with torpedoes, they can actually make for a quite threatening ship that can punch above its weight. They are also critical for combat against submarines with sub detection and sub attack.
Submarines (SS) – Submarines are not screening ships nor capital ships but rather fall into their own category. They are slow, cheap, and, potentially, lethal. Useful against enemy convoys and unscreened ships, submarines rely on stealth to attack from the depths. If detected, they will quickly be destroyed. However, if they can remain undetected by the enemy, they can do some serious damage with their torpedoes.
Convoys – Convoys in HOI4 are a generic one-size fits all ship type for logistics ships. In the game, convoys are used to transport resources, supplies, and troops across the seas. They have negligible attack and air defense and can’t be used in combat. The game will automatically pull and return convoy ships to your national stockpile as needed to fulfil your logistics.
Stats
Heavy & Light Attack – The more attack your ships have, the more damage they will do to enemy ships. Heavy attack refers to heavy gun batteries and is better at targeting larger ships. Light attack is for light gun batteries and is better at targeting smaller ships.
Heavy & Light Piercing – Similar to the piercing concept for tanks, ships use piercing vs. armor values to determine if an attack ‘goes through’ or not. Unlike tanks, the system for naval combat is not binary. If an attack has less piercing than the enemy ship has armor, you will still do damage, just at a reduced scale.
Armor – As referred to above, your ship’s armor rate is how difficult it is for enemy attacks to pierce it and deal full damage. Even if armor is not pierced, damage will still be taken just a reduced percentage.
Torpedo Attack – This stat is only for ships that have torpedo launchers. Torpedo attack can be devastating because it completely ignores the armor rating of a ship. However, to hit an enemy ship, it must first pass through the torpedo screen. This is why proper screening is so important in fleet composition.
Depth Charges – The only way for ships to attack and damage enemy submarines is with depth charges. The higher this stat, the more damage you can do to subs. Keep in mind that in order to use depth charges, you must first locate the enemy submarine. You can’t attack what you can’t detect!
Anti-Air – The AA stat represents how much damage your ship can inflict against enemy planes that are attacking it. By destroying planes before they can attack, you are effectively increasing your ship’s defense.
Your ships can only fire at enemy planes if they are being bombed whether by the naval strike or the port strike missions.
Speed – Speed is critical to your ships’ design. It affects how difficult your ship is to hit. It also determines how effectively your fleet can close with or retreat from an enemy fleet. The faster the ship, the better regardless of type.
Organization – As in land combat, ships have organization that when exhausted, forces them to retreat from battle. The higher your ship’s organization, the longer it can fight. Organization for different ship types is increased through naval doctrines. Ships with low organization also suffer combat penalties.
HP – HP is a measure of how much damage your ship can take before being sunk. Once HP reaches 0, your ship sinks. Bigger ships like BB’s naturally have more HP than smaller ones like CL’s or DD’s.
Reliability – Representing having a secure magazine or lack of fuel leaks, reliability affects your ship’s survival chances in combat. Every time an enemy ship scores a hit against your own it has a chance to score a ‘critical hit.’ Critical hits do much more damage as the name implies and can be devastating. The higher your ship’s reliability, the less likely hits turn into critical hits.
Deck Size – Only for Carries, deck size is simply the number of planes that can be based on it. The larger the deck size, the higher number of planes that your carrier can use and thus increase its offensive and defensive capabilities.
Visibility (Surface & Sub) – Visibility is a measure of how easy your ship is to detect. Lower numbers are better here. Remember that enemy fleets and planes (land or carrier based) cannot engage you if they can’t detect you and vice versa. Ships with higher visibility are also easier to hit than ships with low visibility.
Detection (Surface & Sub) – The opposite of visibility, detection is the ability of your own ship to locate enemy ships and submarines. Only once a fleet or ship is detected, can an engagement begin. Do remember that surface and sub detection are unrelated values meaning that a ship that has a high surface detection stat may not be able to detect submarines. To detect subs, you will need ships that have a high sub detection stat.
Fuel Usage – Depending on the nation you are playing as, fuel usage might be critically important when designing ships (Hello Japan!) or an afterthought (Hello USA!). Larger ships use more fuel than smaller ones with the largest consuming a significant amount.
Naval Missions
As with the air force, your navy has specific missions it can conduct. Unlike the air force, most ships can perform most missions. Having said that, there are certain ships better suited for specific missions than others. Knowing how missions function and which ships perform them best will help you effectively operate your navy.
With all missions, you need to set the rules of engagement for each fleet. ‘Always engage’ all the way down to ‘never engage’ will dictate how aggressive your fleet is and at what strength ratios it is willing to engage at.
Naval Exercises – Similar to planes, ships can perform naval exercises to gain experience (up to regular). They will only consume 80% of the fuel they would normally during an actual mission. Unlike planes, ships running naval exercises will grant your nation a fairly substantial amount of naval experience which you can use to upgrade designs, speed up research etc.
On the other hand, running naval exercises increases the chance of naval accidents. Unlike planes, ships are not cheap to build and an accident could tie up some of your dockyards for a while to perform repairs.
Patrol – This mission has your ships sailing around a sea zone looking for enemy fleets. You will ideally want ships with good surface/sub detection and low fuel usage. If they find an enemy fleet, your other fleets can join battle along with any air wings you may have dedicated to naval strike in the sea zone.
Strike Force – This mission works by having a fleet sitting in port on stand-by ready to sally out to a specific sea zone and engage if an enemy fleet is detected. This is beneficial for two reasons. First, it keeps your ships from burning precious fuel, as they are mostly just sitting in port. Second, it allows them to project naval dominance score to a sea zone, without actually having to do anything.
Convoy Raiding – Ships set to convoy raiding will actively hunt down and attempt to intercept enemy convoys. When running this mission, keep in mind that the AI is now intelligent enough to recognize where its convoys are taking losses and switch up their route when possible. As such, you may occasionally need to switch regions making convoy raiding a deadly game of cat and mouse.
Convoy Escort – The opposite of convoy raiding, convoy escort has your ships sailing alongside your convoys attempting to ward off any attacks against them.
When running convoy escort you need to keep escort efficiency in mind. If the number of sea zones is too large for your limited number of ships, you will suffer escort efficiency penalties. The higher these penalties, the longer it will take your escort forces to assist convoys in battle when they are attacked. You can increase escort efficiency by increasing the number of ships dedicated to convoy escort.
Minelaying – If your ships have the mine rails or mine tubes modules, they can perform the minelaying mission. In HOI4 mines give you several benefits. In a given region, they increase your naval supremacy score, decrease enemy ship speed, and increase enemy ship accident chance.
Mines can only be laid if your country is at war. If you have certain techs researched, it is also possible to lay mines using planes.
Axis forces have laid a considerable number of mines in this sea zone which will give the Royal Navy problems if it wants to operate there without minesweeping first.
Minesweeping – The counter to minelaying is minesweeping which removes enemy mines from a given sea zone Only ships equipped with minesweeping gear can perform this mission. It is also possible to conduct aerial minesweeping if the right techs have been researched.
Naval Invasion Support – Ships running this mission will escort your troop transport ships all the way to invasion site. Once there, there will be naval bombardment as long as an active battle occurs. If no battle is happening, they will return to port once your troops have landed.
Shore Bombardment – While not actually a naval mission, shore bombardment is nevertheless a key task that your navy can perform. Any fleet that is stationary next to coastal tiles will perform shore bombardment against enemy forces if a battle is happening there.
Each point of heavy attack in the fleet will give a -0.1% attack penalty to the enemy while each point of light attack will give a 0.05% penalty. The cap for this is -25%.
Naval combat in HOI4 is a complicated matter. There is quite a bit of math involved that is not really in the scope of this guide. Rather, this guide seeks to give you a basic understanding of how the mechanics work. If you wish to see the exact formulas used, here is a link to the wiki.
Spotting & Positioning
As previously stated, before any naval battle can take place, one fleet needs to spot another one. Once a fleet is spotted, then combat begins.
The defending fleet always starts with perfect positioning while the attacking fleet’s positioning depends on their fleet composition and their admiral. Having a high positioning score decreases the amount of screening ships needed to effectively screen your capital ships.
The storm makes it difficult for the Royal Navy destroyers to spot the Italian submarines. Notice the -20% to detection penalty.
Layout
In HOI4, there are four ‘battle lines’ for ships. The screening line, the capital line, the carrier line, and the submarine line. Each line is filled with different types of ships and tries to protect the line behind it.
Ships in the screening line are called screens and consist of destroyers and light cruisers. They will attempt to protect the capital line from torpedo attack from the enemy screening ships. If the enemy has insufficient screens, they will attempt to attack their capital line with torpedoes.
Next up is the capital line. Battleships, battlecruisers, and heavy cruisers are the ships that make up this line. They will attempt to use their heavy guns to attack the enemy capital line. They can use their light guns to attack the enemy screening line as well. Finally, they will attempt to protect any carriers your fleet might have from the enemy fleet’s gunfire.
The last main battle line is the carrier line. Here there are only aircraft carriers. They will attempt to use their carrier air wings from long range to bomb the enemy fleet. If the enemy capital ships or screening ships can manage to get into range, however, it will not be good for your carriers! Protect them with your own capital line and screening line.
Finally, there is the submarine battle line, although perhaps it is better not to think of it as a line. If submarines remain undetected, they can strike anywhere at the enemy battle fleet. Thus, it is important to have sufficient screening for all of your capital ships.
Screening
It is vital to ensure that your valuable capital ships are screened properly. For capital ships a ratio of four screens to one capital is almost always enough to ensure adequate screening. Carriers will need four screening ships and one capital ship to be properly screened.
Ships without adequate screening are much easier to hit by lighter ships and torpedoes. Ships that are screened properly receive combat bonuses.
Weapons & Targeting
There are four basic weapon types that ships can be equipped with: heavy guns, light guns, torpedoes, and depth charges. They all follow different rules when it comes to which ships they can target. Each shot has a base 10% chance to hit its target. The target’s visibility score also affects how easy it is to be hit with lower visibility ships being more difficult to hit.
Depth charges – Depth charges are the only weapon type that can target a submarine and even then only when it has been revealed. Only available to equip on destroyers and light cruisers.
Light guns – Light guns can only target ships in the closest battle line. Mainly equipped on screening ships but can also be added to capitals.
Heavy guns – These guns can only be equipped on capital ships, but they can target enemy ships in the screening line and the capital line.
Torpedoes – Torpedoes can do a lot of damage but rely on the enemy having poor screening to target ships in the capital line or the carrier line.
Damage
Damage done depends on the Attack stat of the attacking ship. It also depends on whether the defending ship’s armor was pierced or not. If armor is not pierced, damage will be reduced but not eliminated.
Critical hits can also be scored, which cause much more damage and have a chance to disable some of the key systems of a ship. Torpedoes have a 20% chance of each hit becoming a critical hit whereas all other attacks have a 10% chance.
Planes
Planes launched from carriers or from land can attack every 8 hours. The amount of planes that can attack is based off the amount of HP in the enemy fleet. However, a minimum of 20 planes are always allowed to attack.
Before planes can attack enemy ships, they must evade the ship’s AA. Planes with higher agility will have a better chance to avoid being hit.
The amount of damage planes do is based off their naval attack stat. Their naval targeting stat determines how likely they are to land a hit.
The famous Japanese Zero. Notice it has the small carrier icon, which means it can be based on aircraft carriers. Planes without this icon cannot be used on aircraft carriers.
Carrier Stacking Penalty
There is a limit to how many carriers you can include in any single fleet before it starts to suffer stacking penalties. Each carrier over four increases the stacking penalty by 20%. The stacking penalty is not a combat penalty but rather a limit to the number of planes that can sortie out.
However, this only applies to bombers and not fighters; therefore, many players add additional carriers after four but only fill them with fighters.
Only carrier plane variants can be based on carriers, so be sure to research and build them if you want to include carriers in your fleets.
Naval Supremacy & Naval Invasions
Indirectly related to naval combat is naval supremacy. Similar to air superiority, it is a tug of war score between your naval presence in a given sea region compared to the enemy. It is determined by the combat potential of all the ships that have assigned missions in a particular sea zone.
Remember that ships on the ‘strike force’ mission still contribute to this score even though they are not physically present in the region.
Britannia rules the waves! Color marked sea zones make it easy to see where you have naval supremacy. Remember that naval invasions cannot be conducted unless you have the minimum naval supremacy score.
To execute a naval invasion, you will need to have at least 50% naval supremacy in the sea zones along the invasion route up to the target. You will have to use the battle planner (land warfare) to plan the naval invasion and then wait until the plan is ready to execute. It will also require a certain amount of convoy ships depending on how many divisions you have assigned and how long the invasion route is.
After achieving the required naval supremacy, the British have decided to go for an early D-Day. Notice the planning time. The operation can only be launched after the 49 days of preparation have been completed.
That is naval warfare in Hearts of Iron 4. From planning and construction to tactics and battle, you now have the knowledge required to dominate the high seas. Be sure to check out the final part of the tutorial series, which deals with diplomacy and espionage. (Link to future part 5 here)
Land combat is probably the most important aspect of the military in Hearts of Iron 4. However, one should not underestimate the importance of air power.
Air power serves as a force multiplier for your land forces and as such, can be the difference between victory or defeat.
In this section of the tutorial, we will examine all of the basics of air power so that you can take advantage of all of your country’s potential.
Planning: What do I want my Air Force to Do?
There are several important aspects to consider when planning and building an air force in HOI4. Plane types, their stats, what missions they can perform, as well as basing and logistics all need to be taken into account if one is to utilize air power effectively.
Stats
Here we will go over some of the more important stats for planes.
Speed – Speed is important for almost all planes. Having a speed advantage over enemy planes reduces their ability to damage yours. It also increases your own damage against enemy planes.
Agility – Agility is how difficult your plane is to hit. Higher agility combined with high air defense will make your planes very resilient. Agility also affects how easy it is for your plane to damage an enemy plane, thus having high agility for fighters is key.
Range – Range is simply the operating radius of the plane. Planes assigned to air regions that are larger than their range will suffer mission efficiency penalties, which can be substantial.
Air Attack – Air attack is a measure of how much damage your plane can do to enemy planes.
Air Defense – Air defense is how much damage your plane can take before being shot down.
Ground Attack – Ground attack measures how much damage your plane can do to enemy divisions. This is both organization and strength damage.
Strategic Attack – Strategic attack is how much damage your plans can do to enemy buildings such as civilian and military factories, forts, refineries etc. It has no direct effect on enemy ground troops.
Naval Attack – Naval attack is how much damage your plane can do to an enemy ship. Especially important for any carrier-based planes.
Naval Targeting – Naval targeting is a measure of how likely your plane is to land a hit on an enemy ship.
Plane Types
There are 8 basic plane types in HOI4:
Fighters
heavy fighters
close air support
tactical bombers
strategic bombers
naval bombers
scout planes
and transport aircraft.
(There are technically more if you count the carrier variants you can build for some of the types). Jet aircraft and rocket interceptors aren’t really useful in the game so I won’t cover them in this guide.
Each plane type has certain strengths and weaknesses that make it more suited to certain missions and roles.
Fighters – Fighters are the most prevalent plane in the game. They are used to wrest control of the sky by shooting down enemy planes. They can also defend your own airspace against enemy bombing raids.
They have the highest speed and agility of any plane, which makes them ideal for this role. They can only perform air combat, however, are limited to air superiority and intercept missions.
Heavy Fighters – Heavy fighters have a similar function to regular fighters. They are designed to shoot down enemy planes in order to establish air superiority over your enemy.
There are a few differences though. Heavy fighters are slower and less agile than fighters but they have a much higher air defense. This makes them ideal for attacking enemy bombers when running the intercept mission.
Additionally, they have a much longer range than fighters which means they can function as fighter escorts for your own long-range bombers.
Close Air Support – These are rather short-ranged dive-bombers whose primary function is to support your army in combat by bombing enemy divisions. They have the highest ground attack score of any plane. They can also function as naval bombers in a pinch.
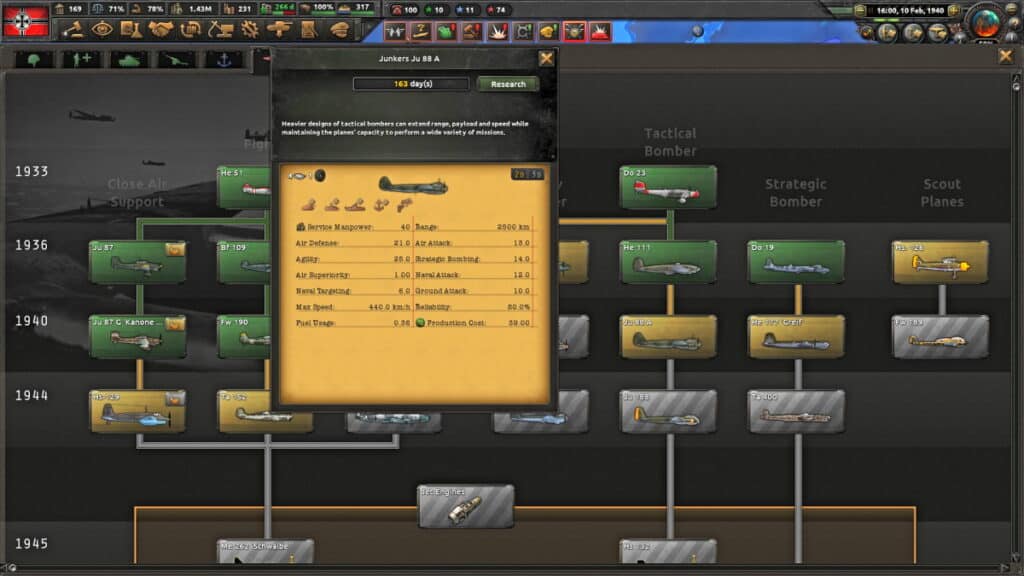
Tactical Bombers – A personal favorite of mine, tactical bombers are the jack-of-all-trades plane. They have a decent ground attack, naval attacks, naval targeting, and even strategic attack. This makes them capable of filling any bombing role you need them to, albeit worse than the specialized bombers.
Tactical Bombers have more than twice the range of close air support and naval bombers, which is another nice bonus.
Strategic Bombers – These are the big boys. Massive four-engine bombers that are expensive to build, but that can absolutely devastate enemy industrial output. Having decent air attack and defense means that, while they won’t be winning you air superiority, they are no pushover in air combat.
Because of their expense, they are not suitable for every country to build.
If we lose the war in the air, we lose the war and we lose it quickly
Naval Bombers – Curiously, naval bombers in HOI4 have a quite limited range, unlike their real-life counterparts. They make up for that though with the ability to shred enemy fleets. Having enough naval bombers can make an enemy fleet think twice about sortieing out. Unfortunately, they are unable to perform any other missions other than naval and port strikes so they cannot double as ground-attack aircraft.
Scout planes – Scout planes are used in HOI4 to gather intel. The intel gathered builds up slowly over time and acts as a bonus to your national intel on an enemy nation.
Having an intel advantage over your opponent gives your ground divisions a boost in combat performance.
Transport Planes – Finally, we come to transport planes. They are rather expensive to build but they allow for some key missions: Para drop and air supply.
Dropping paratroopers behind enemy lines can be effective if done right and under the correct circumstances.
However, the air supply mission is where they really shine. Transport planes allow you to have some room for error when it comes to supplying your troops. I build them any time I’m playing a major.
Hearts of Iron 4: Tactical bombers – the do-it-all plane
Mission Breakdown
Now let’s look at the different missions your planes can undertake in Hearts of Iron 4. Note that not all planes can perform all missions.
Pilot Exercises – While not a combat mission, pilot exercise is a critical mission nevertheless. When running pilot exercises, your airwing will gain experience (up to ‘regular’ level). This is useful in peacetime to get your air force ready from the moment that war kicks off.
It will also generate a very small amount of air experience for your country. Keep in mind that this all comes at the cost of fuel spent and an increase in air accident rate.
Air Superiority – Airwings performing this mission will attempt to engage and destroy enemy air wings operating in the region. When you want to gain air superiority over an air region, this is the mission to run. Only fighters and heavy fighters can run this mission.
Air Intercept – A defensive form of air superiority, airwings running intercept will attempt to disrupt and destroy enemy bombers running bombing missions.
Keep in mind that your air wings will not engage enemy fighters. This mission is useful to defend your airspace from bombing attacks.
It can also be used if you are significantly outnumbered or outclassed by the enemy fighters and want to avoid them.
Close Air Support – Airwings running close air support will attack and damage enemy ground divisions. They will only attack if there is active land combat happening in the air region so you can’t set your bombers to ‘soften up’ the enemy before an offensive.
There is also a limit on how many of your bombers can attack the enemy which is based on the combat width size of the land battle.
In addition to the raw strength and organization damage they do, close air support attacks will provide a combat bonus to your ground divisions.
Remember that to be most effective, your bombers have to get through to attack without being disrupted. This means having dominance over enemy airpower in the region.
Strategic Bombing – Strategic bombing has no direct effect on land combat. Rather, it is the bombing of enemy buildings, infrastructure, and industry.
Within the strategic bombing mission, it is possible to prioritize targets to make your planes focus on radar, forts, airbases etc.
Targeting an enemy’s industry can cripple their war effort. Although, you should keep in mind that strategic bombers are quite expensive to build and that a fairly large amount of them will be required to inflict significant damage on the enemy.
Naval Strike – Naval strike is a mission that targets enemy ships in an air region over the sea. In order for your planes to actually attack the enemy, their ships must first be detected/found. If there is already a naval battle happening, your planes will automatically join the fight.
Thus, coordination between your air force and navy is critical for this type of mission. Naval strike can also target enemy convoys, although only those carrying troops.
Port Strike – Port strike also targets enemy ships while they are at base in a port. Therefore, a port strike must target a land region with one or more ports in it. Unlike other missions, port strikes require at least 30% air superiority in the chosen region before they can be launched.
Logistics Strike – Newly added in the No Step Back DLC, logistics strike attempts to choke enemy supply by targeting trains and trucks. If the enemy has a deficit of these in their national stockpile, their logistical capability will be limited. Keep in mind that if you want to damage their railways, you will need to run a strategic bombing mission.
Air Supply – Transport aircraft are the only planes that can run the air supply mission. The amount of supply that each plane can bring has fluctuated as Paradox tries to get the balancing right.
In any case, lacking range or not having air superiority will reduce mission effectiveness, which in turn will reduce the number of supplies that you can transport.
Air Recon – Scout planes are the only aircraft that can run the air recon mission. Each scout plane will slowly add to your country’s total intel on another country until it reaches the cap. The more scout planes you add, the faster the intel will grow.
In addition to damaging enemy divisions directly, my bombers running the close air support mission are providing my divisions a +35% boost to their attack. Nice!”
Organization & Logistics
Now that we know what types of planes to build and what missions we want them to perform, let’s look at how to actually deploy and use them. Airwing size, air bases, radar, and spirits are all things to consider when using air power in the field.
Airwing Size – You can deploy air wings with just 1 plane all the way up to 1000 planes. So which size is the right size?
Most players like to use wing sizes of 100. This gives you flexibility allowing you to target multiple air zones. It also means you can stack airwings on air bases efficiently without suffering over-stack penalties.
All airwings must be of only one type of plane, meaning you can’t mix bombers and fighters in the same wing.
Air Bases – Air bases are needed to station your airwings. They can be built from the construction tab. Placement is important, as airbases will need to be in range of where you intend to launch your missions.
Each level of airbase can operate 200 planes. The maximum is level 10 for 2,000 aircraft. Stationing more aircraft than the capacity allows will lead to over-stacking penalties, which can be crippling to mission efficiency.
Carriers – Airwings can also be based on aircraft carriers. The amount of them is limited by the deck size of the carrier. Larger deck sizes means more planes.
Remember that only specific carrier variants of planes can be based on them. Regular planes cannot.
Radar – Having radar stations built in your territory will give a substantial bonus to detection. Detection, as we will see in the next section is crucial in air combat. Be sure to keep up with research and construction on radar if you intend to control the skies over your own territory.
Spirits – The No Step Back DLC added the officers tab. In this tab, you can select certain spirits for your armed forces using relevant experience. These spirits add certain bonuses to the branch ranging from increased research speed, faster training, mission efficiency buffs, etc. Be sure to look through them and decide which best fit your overall strategy for your air force.
Having a level 2 radar station built gives me partial but not full radar coverage in Western Germany. This in turn helps my fighters detect and intercept Allied bombers
Air Combat: Owning the Sky
Now that you have planned and built your air force, it’s time to put it into action. But how exactly does air combat work? The answer is a series of complicated mathematical formulas, the scope of which is a bit beyond this tutorial. This is the respective HOI4 wiki.
I will, however, give a general overview of air combat and how it works in Hearts of Iron 4.
Detection
As mentioned earlier, detection plays a critical part in air combat. Simply put, if you don’t know where enemy planes are, you can’t engage them. In-game terms the amount of air detection you have determines the number of your own planes that can engage the enemy planes.
For example, if the enemy launches a bombing raid over your territory and you have fighters set to engage, if you have low detection then none or only a handful of your fighters will actually enter combat.
Detection is improved by occupying ground in the air region (think having more ground spotters), having planes in the air region running missions, building radar installations that cover the air region, and by having certain doctrines and spirits. It is impaired by nighttime (-20%) and bad weather (-90%).
Due to the bad weather, my detection is quite low at 13%. This makes it very difficult for my fighters to effectively engage the Allied bombers. Notice the low disruption rate
Damage
When your planes attack enemy planes they will use their air attack stat to deal damage to the enemy plane. If the damage done to a plane is higher than its air defense stat, it will be shot down. Planes use agility and speed to avoid being hit and to gain an offensive bonus against other planes. Once again, the wiki provides the actual formula if you are interested.
Disruption
Shooting down enemy bombers is great but what happens much more often is disruption. Disruption occurs when bombers are engaged by fighters and forced to abandon their mission and return to base.
If air detection and fighter presence are high enough, it is possible to completely disrupt bombers and render them useless.
Disruption can be countered by ‘escorting’ bombers with fighter wings set to run the air superiority mission in the same air zone. This works by forcing the enemy fighters to also engage with your own fighters, thus freeing up your bombers from harassment.
Air Superiority
Air superiority in HOI4 is simply the percentage of control over a particular air region that you have. It is a tug-of-war percentage of 100. Your air superiority score is increased by having planes running missions in the region. Even planes not running the ‘air superiority mission will contribute to this score.
Each plane gives 1 point of air superiority, however, there are exceptions. Heavy fighters give 1.25 and strategic bombers only give .1. Scout planes and transport planes provide none. Building static AA will reduce the enemy’s air superiority score.
An air superiority level of less than 40% is known as ‘red air’. 60% and up is known as ‘green air’ and 41-59% is known as ‘yellow air.’
Air superiority is vital in HOI4 because, for every 50 points of air superiority you have over your opponent, their ground divisions will suffer a 1% penalty to their defense and breakthrough stats.
Having air superiority will also affect enemy divisions’ movement speed making them slower (to simulate only being able to move at night etc).
With a 32% air superiority score, the Allies really have me outgunned here. If I don’t do something about the situation in the air, my ground divisions will find it increasingly difficult to fight effectively
So there it is; the basics of air combat in Hearts of Iron 4. You should now have everything you need to conceptualize, build, and use air power.
Use the knowledge to dominate the skies and remember the wise words of Field Marshall Montgomery “If we lose the war in the air, we lose the war and we lose it quickly.”
While part 1 of this tutorial guide looked at the economy as the foundation of your country’s power, parts 2, 3, and 4 will focus on the military: the primary application of your country’s power. {If you haven’t checked out part 1 of the tutorial, you can access it by following the link here.} Having the strongest economy in the world doesn’t mean much if you can’t leverage it with a competently designed, well-trained military.
In this guide, we will look specifically at land combat. Land combat is by far the most prevalent form of combat in the game. As such, it will be the largest of the military guides. We will look at basic combat mechanics, combat width, logistics, an overview of unit stats, as well as terrain modifiers.
Combat Mechanics
Combat in HOI4 is a combination of unit statistics, modifiers, and dice rolls. Understanding how these all interact with one another is vital to finding success on the battlefield.
Cardinal Stats: Organization & Strength
Organization is the single most important stat for your divisions. It represents the willingness and ability of your units to fight. If your division’s organization is at zero, it can’t fight.
Organization is lost from movement, combat, and lack of supply. If your unit is in supply, it will recover over time. Your unit’s organization cap can be increased with various doctrines that can be found in the officer tab and unlocked with army experience.
Strength represents, well, the strength of the division. It is always represented as a percentage of 100. Strength includes both a division’s manpower and, more importantly, its equipment. If your division is not at full strength, its stats will be lowered accordingly by whatever equipment it is missing. If divisions are in supply, they will reinforce automatically as long as there is equipment and manpower available.
Offensive Stats: Soft Attack and Hard Attack
Soft attack measures how many attacks your unit can make against an enemy unarmored (soft) unit. In this case, the higher the number the better. Certain battalions like artillery provide a substantial amount of soft attack.
Hard attack is the same mechanic but for attacks against armored (hard) units. These values tend to be much lower than soft attack for most battalions. Some battalions such as anti-tank, however, provide a large amount of hard attack.
Defensive Stats: Hardness, Breakthrough, and Defense
Hardness is the ratio of enemy soft and hard attacks that your division will be affected by. It is always expressed as a percentage of 100. Essentially, hardness is supposed to represent the percentage of the unit that is armored.
If a unit has a hardness of 10%, it means that it suffers 90% of enemy soft attacks and 10% of enemy hard attacks. Conversely, a unit that had 90% hardness would only suffer 10% of enemy soft attacks while taking 90% of their hard attacks.
Because of how much more soft attack units tend to have compared to hard attack, it is always worthwhile to make your units as hard as possible.
Defense is a measure of how good your unit is when holding ground. If your unit’s defense stat is higher than the enemy’s attack stat (soft and hard together in the correct proportion), then your unit only has a 10% chance of taking a ‘hit’. If the enemy has higher attack than your defense, that chance goes up to 40%.
Breakthrough functions the same as defense except that it applies when your unit is attacking. Thus, having high breakthrough is crucial for your attacking units.
Each ‘hit’ in combat deals 1d2 damage to your unit’s strength and 1d4 damage to your unit’s organization. As stated earlier, when a division’s organization hits zero it must disengage from combat and retreat.
Because of its high breakthrough, the German motorized division is able to ‘absorb’ all of the attacks from the Polish division only getting hit 10% of the time
Combat Width
Combat width is very important to understand in HOI4. Not building divisions intelligently in regards to width is probably the number one mistake new players make when first playing the game. Having trouble pushing through the Low Countries on your way to Paris as Germany? Combat width probably has something to do with it.
Divisions in HOI4 take up a certain amount of space at the front. This is referred to as combat width. Ideally, you want to completely fill up all available width but not exceed it. If you exceed the available combat width, all of your units involved will suffer stacking penalties.
Since the No Step Back DLC and update, each different terrain type now has a different combat width. There is no longer a ‘one-size fits all’ width template for divisions.
All tiles have a base combat width. Any additional attacks coming from different tiles will increase the width of the battle by half or a third of the original base width. For example, plains and deserts both have a base combat width of 90 with an additional 45 added for attacks incoming from a different tile. So, if a plains tile was being attacked from three different tiles, the combat width would be 180. But, if a mountain tile (width 75) was being attacked from three different tiles, the combat width would only be 125.
Here is a list of all-terrain types and their combat widths.
With these widths in mind, a common division template players build is a ‘9-1.’ This is 9 battalions of infantry and 1 battalion of artillery. It has a width of 21. 21 is a nice width because it allows four divisions to attack most terrain types without any stacking penalties.
We will dive further into terrain and how it affects combat later in this guide.
Combat width is 90 in plains provinces. If I attack with a division to the North, it will expand the width to 135
Logistics
“Amateurs study tactics, professionals study logistics.” A common military saying that also strikes true for HOI4. Without supply, even the most experienced, well-equipped division will be useless. Divisions out of supply will suffer a progressively harsher penalty depending on how much supply they are short. If a unit is completely out of supply, it will not recover organization and will slowly lose it.
Since the No Step Back DLC, logistics has gotten a rework. While being difficult to understand at first, once you get the hang of it, it is actually very straightforward.
Supply Draw
Each of your divisions has a supply use stat. This information can be found on their division template. Supply use is how much supply is needed to keep the division in supply and performing at full capacity. Keeping supply use as low as possible is recommended and the logistics support company does just that. More on that later. Note that unlike previous versions of the game, supplies no longer need to be produced.
Railways and Throughput
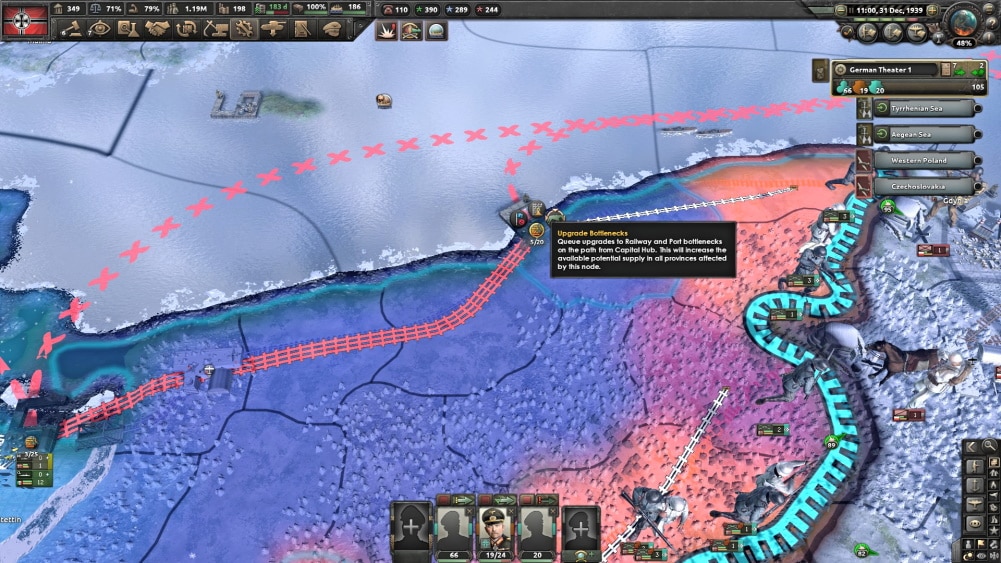
The main mover of supply is now constructible railways and trains. Level 1 railways provide 15 supply to the hub they are connected to. Each additional level of railway provides another 5 supply to the hub for a maximum of 35 with a level 5 railway. In order to get the desired throughput, all railways from the capital to the supply hub must have the appropriate level of railway. Throughput is always based off the level of the lowest relevant railway for the connection so be on the look out for bottlenecks!
Here you can see a bottleneck in supply due to the railway level being too low. By clicking the upgrade bottlenecks button, all of the relevant railways all the way to the capital will be automatically queued up for construction
Supply Hubs
Supply hubs have a maximum range from which they can supply units. The ability for a hub to supply a unit gets progressively worse the further away a unit is from the hub. Eventually, a unit will be too far away and will be unable to be supplied from the hub. This is why when you are conducting offensives, it is vital to locate enemy supply hubs and capture them as without them, your offensive will quickly grind to a halt.
You can increase the range of your supply hubs a few ways. The first is simply to increase the amount of supply that is getting to the hub. Having level 5 railway connections all the way to the capital really helps.
You can also increase the motorization level of the hub. You can do this by clicking on the hub and then clicking on the horse icon and changing it the truck icon. There are two levels of motorization. Level 1 takes 40 trucks per hub and level 2 takes 80. Remember that these trucks do not require fuel but will suffer from attrition and enemy air attacks.
Finally, you can increase the infrastructure level. Each level of infrastructure will allow the hub to transfer more supply to the next province over. Although it is a small amount, it is per each province so it adds up quickly.
The dark red hashed lines show which provinces are currently in range of the supply hub. By clicking on the motorization button, the range will be increased to the brighter pink hashed lines
State Supply
Supply also comes directly from the states you control. The amount is based off the population level, the amount of Victory Points (if any) present, and the level of infrastructure. Keep in mind that this amount of supply is generally very low and to support any large amount of units will require a logistics network as we have previously discussed.
Weather
“The two rules of warfare:
never start a land war in Asia.
never march on Moscow in the winter.
Another military maxim that also strikes true for HOI4. Since No Step Back, weather and weather effects now greatly affect your logistics and thus your ability to conduct effective military operations.
Both acute weather effects such as blizzards, sandstorms, and storms as well as seasonal climatic effects like cold or hot temperatures, deep snow, and mud can absolutely devastate a logistics network.
Fighting in such conditions is ill-advised unless it is absolutely necessary.
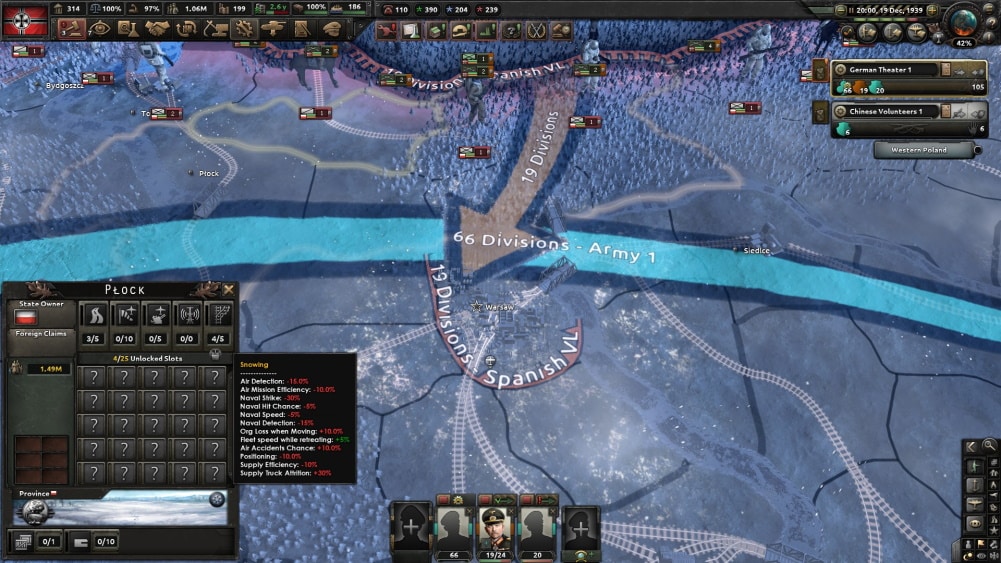
In the lower left part of the screen you can see the negative effect the snow has on logistics. Keep in mind this is only snow in December. It gets worse!
Air Supply
Finally, we come to air supply. If you are playing as a major nation, you may well have a decent-sized fleet of transport planes. It is possible to set them on the mission ‘air supply’ and have them drop supplies to your units. Keep in mind that if the enemy has air superiority, this will not go well. Additionally, the amount of supply that can be air dropped is relatively small so don’t expect to supply entire armies with it. It is more of a band-aid type of solution.
Unit Statistics
While we already looked at some key unit statistics like hard and soft attack, defense, etc, here we will go over some other stats. I won’t cover all unit stats but rather highlight some of the more important ones and explain how they function in the game.
Armor and Piercing
If a unit has a higher armor rating than an enemy has piercing then it gets a massive boost in combat. It only suffers 50% of all enemy attacks hard or soft. Additionally, it deals an extra 50% organization damage to the enemy unit. If the enemy has more piercing than you have armor, then your units are ‘pierced’ and combat happens as it normally would without any bonuses or penalties. Piercing in HOI4 is all or nothing. It doesn’t scale.
To add armor to your divisions add more hard units like tanks and half-tracks and remove soft units like infantry. You can also upgrade the armor level of your tanks. To improve your division’s piercing stat consider adding anti-tank battalions, anti-air, or tanks and tank destroyers.
Keep in mind that armor and piercing are averaged for the entire division. If you have just 1 battalion of heavy armor or 1 battalion of heavy tank destroyers mixed with many battalions of infantry, the armor and piercing stats for the entire division will be reduced.
HP
HP in a division affects how much manpower and equipment you lose when your unit inevitably takes losses. Low-HP divisions will take more manpower and equipment losses for each % of strength lost. Infantry has the highest HP stat of all the battalions and is usually a core component of any division. This is why pure tank divisions fare poorly in HOI4.
Air Attack
Divisions with a high air attack stat have the chance to deal considerable damage to enemy planes that are bombing them. Unless you anticipate having air supremacy, having some air attack in your divisions is usually a good idea. In addition, shooting down planes, it reduces the bonus from air superiority that an enemy might get. Finally, it also has the effect of increasing the division’s piercing stat by a fair amount. Your units can only engage enemy planes that are actively targeting them with ground attack. It has no effect on strategic and logistical bombing done by the enemy.
Here we can see how having AA in my divisions is reducing my penalty for the Poles having air superiority
Manpower
Manpower is how many men are required to keep the division at full strength. If you are a nation pressed for manpower you can either increase the level of conscription law (although this has heavier penalties for your economy the further you go), or design divisions that are less manpower intensive. Infantry is a very manpower-intensive battalion whereas artillery or armor provides much more firepower for less manpower cost.
Entrenchment
Entrenchment is how much of a bonus your units will get from digging in. Any unit that is stationary and not in combat will start digging in. Dug-in units receive combat bonuses for their offensive and defensive stats. This only applies when they are attacked however as it is lost as soon as they move.
The higher a unit’s entrenchment stat is, the higher its dug-in bonus will be. Most units share their country’s base entrenchment stat but it can be increased by adding an engineer support battalion as well as certain command traits and doctrines.
Trickle Back and Exp Loss
If you add the hospital support company, you will see trickle back and exp loss added to your unit’s stats. Trickle back works by adding a small amount of manpower back to your national pool from any combat losses you might take. Exp loss means that each casualty your division takes will bring down the overall unit’s experience level by a lesser amount.
While these bonuses sound amazing and great to have, unfortunately, they are not. The way HOI4 is set up, the hospital support company is very expensive in terms of industry and opportunity costs. Additionally, most nations never have manpower shortages so it’s only worth it in a few niche cases.
Terrain Modifiers
We already looked at the terrain as far as it pertains to combat width. Now let’s examine how terrain impacts combat as a whole.
Plains
Plains are the basic terrain type in HOI4. They have no modifiers whatsoever. This makes them the easiest to attack but the hardest to defend.
Deserts
Found in North Africa and the Middle East, deserts are common enough in HOI4. They don’t give any combat penalties but they are taxing logistically. Fewer supply moves from hubs and supply trucks take more attrition. Additionally, all equipment is subject to a +15% attrition penalty. Units also suffer a -5% to movement cost. Finally, your generals have an increased chance to fall ill. In deserts, less is more. Try to make due with fewer units. Large armies have no place here.
Forests
Forests give a -15% attack penalty as well as -50% to movement cost. There is also a small penalty to supply flow from hubs and truck attrition but it isn’t as bad as in other terrain types. Having air superiority will only provide 90% of its bonuses here. While attacking into a forest isn’t ideal, it also isn’t horrible.
Jungles
Fortunately, jungles are not found in the main battle arena that is Europe and its periphery. However, the Asian, African, and South American theaters have plenty of them. Jungles give some nasty penalties. -30% attack, -50% movement cost, +20% attrition rate, as well as a very large truck attrition rate means that they are not fun to attack or defend. As with deserts, your generals have an increased chance of falling ill here. Air superiority counts for significantly less here so it is a terrain that can act as an equalizer for two mismatched opponents.
Hills
While definitely an idyllic landscape, hills aren’t great to attack into. They give a -25% to attack and -50% to movement cost. Air superiority is only 95% effective here and there is a small penalty to supply flow from hubs and truck attrition. If you anticipate fighting a lot in hills, it would be worthwhile to recruit mountaineers who will have bonuses in such terrain.
Due to their special training, Mountaineers actually receive a terrain bonus in hills
Mountains
Mountains are big hills. They give a whopping -50% to attack and -100% to movement cost. Supply flow from hubs is reduced and truck attrition are significant here as well as a general +30% attrition rate on all equipment. Mountaineers have milder versions of the attack and movement penalties so if combat in mountains can’t be avoided, it is best to use them.
These harsh penalties along with a narrow base width of 75 means that mountains are one of the most difficult tiles to attack.
Marshes
Just like the Dead Marshes in the Lord of the Rings lore, marshes in HOI4 should be avoided at all costs. This is the absolute worst terrain to fight in. +100% movement cost, +35% attrition rate, -40% attack, increased chance of illness, and massive supply hub flow and truck attrition penalties make this terrain type a nightmare to deal with. Forcing your opponent’s divisions into marshes while avoiding them yourself is a sound strategy.
Urban
Urban areas are very common in Europe with most countries at least having a few tiles. Urban areas give a +20% movement cost, and -30% attack penalty. Air superiority is only 50% effective here. Urban is the only terrain type that actually provides a supply hub flow bonus. As previously stated, urban areas have the highest combat frontage at 96 which means that being outnumbered here will hurt the most. However, if they can match enemy numbers and dig in, defenders can be very difficult to evict from urban tiles.
Pulled from the Hoi4 wiki, here is a terrain map showing where all the different terrain types are in the game
Where Water Meets Land
Although not actually being tiles, rivers and straits need to be discussed here as well. In HOI4, all rivers are classified as either small or large. Small rivers give -30% to attack and -25% to movement cost. Large rivers give -60% to attack and -50% to movement cost.
Amphibious assaults across straits or across open water with transport ships gives a large -70% to attack. Some of these penalties can be lessened through general traits and special abilities. Like mountaineers in their niche terrains, marines perform well here.
Keep in mind that all of these terrain bonuses and penalties are just the base. Every battalion has its own terrain penalties or bonuses that stack with these. For example, a heavy tank battalion will perform much worse than an infantry battalion when attacking a forest, etc.
By now, you have the basics of land combat in Hearts of Iron 4. It is a lot of information to digest. But over time, it will become second nature to you. In the next section of the guide, we will look at combat at sea and in the air.
Economy is first up in this tutorial and that is no accident. Your economy is the foundation that your country is built upon in Hearts of Iron 4. Without it, you will struggle to conquer anything or worse, find yourself easy prey to be conquered by someone else.
I have divided this economy guide into 4 subsections:
We will begin first with construction. You can access everything construction by clicking on the ‘construction’ tab at the top of the screen. Here you can decide which buildings to construct and where. You can queue up multiple buildings at once or build them one by one. Constructing buildings doesn’t require any resources.
Buildings can be broken down into two basic categories:
production buildings
non-production buildings.
(There are also specialist buildings such as rocket test sites and nuclear reactors but these aren’t useful until the late game and even then on a limited basis).
Production Buildings
Production buildings consist of
civilian factories (civs)
military factories (mils)
and synthetic refineries (synths).
These buildings all produce something.
Civs
Civs are what you build with. They are expensive to construct (10,800 construction industrial capacity – CIC) but essential if you plan on building a lot.
Each civ provides 5 CIC (Construction Industrial Capacity = what you use to build.) each day and you can have up to 15 civs working on constructing a single building at a time. This means that with 75 CIC, it would take 144 days to build another civ. (This doesn’t factor in any modifiers like techs, advisors, infrastructure, etc).
Civs are also used to trade for resources needed for production, but more on that later.
Mils
Mils are factories that produce equipment for your armed forces. Mils can produce army equipment like tanks, small arms, trucks, and artillery as well as aircraft for your air force. Ships are produced at naval dockyards instead, which can only be built on the coast.
Synths
Synths produce one oil and one rubber each. This yield can be further increased with techs found in the industry tab of the tech tree. We will discuss rubber and oil along with the other resources in the game later in the tutorial.
Non-Production Buildings
Other than production buildings, there are several non-production buildings that can also be constructed by the player.
Infrastructure
Infrastructure represents the road network and electrical grid of a province and can be built up to a maximum of level 5. Higher infrastructure increases the amount of resources extracted, speeds up construction times, and improves supply throughput in that province.
Railways
Railways are a new addition to the game in the No Step Back DLC. Railways are now the primary route for logistics in the game. A higher level railway (max. level 5) allows for much more supply throughput. Keep in mind that they need to be connected on both ends to a supply hub, however.
Supply Hubs
Supply hubs are another rather expensive building (20,000 CIC). They are necessary, however, to supply your troops in the field. Fortunately, many countries begin the game with several already built so it may not be necessary to construct many, if any, additional ones. Naval bases serve the same function as supply hubs but over the sea rather than on land.
Air Bases
Air bases are needed to station your air force. They can be built up to level 10 with each level allowing an additional 200 aircraft to be based there. If you have too many air wings at an airbase, you will face stacking penalties.
Fortifications
Permanent fortifications can also be constructed. Land forts help deter attacks from other land tiles while coastal forts do the same from attacks coming from the sea. Land forts do not have any effect on amphibious attacks and coastal forts do not have any effect on land attacks.
Forts
Rather than boost your own troops’ defensive stats, forts reduce the opposing troops’ offensive stats. This is actually more beneficial as it can allow understrength, under-equipped troops to hold out against a superior force for longer.
Radar
Radar installations provide intel on enemy forces and assist your air force in combat. When combined with static AA that can also be built in provinces, and your own fighters running intercept missions, it makes for an effective defense against enemy strategic bombing raids.
Silos
Finally, there are fuel silos which are used to stockpile the fuel needed to power your aircraft, ships, and motorized land units. Fuel silos can be built up to a maximum level of 3 in any province. Each silo constructed allows for 100,000 fuel to be stored in the national stockpile. Fuel silos are only needed for fuel and not for crude oil, which requires no storage.
Production
Production is the part of the economy where ‘the rubber meets the road’ so to speak. It is the production of actual equipment, ships, and planes that will be used by your armed forces. It can be accessed by clicking on the ‘production’ tab at the top of the screen.
Equipment is produced in the game in ‘lines.’ The player adds a military factory to one of these ‘lines’ to increase the production of the desired item. Each mil has a base daily production value of 4.75. This means that if you wanted to produce a tank that cost 14.25 production, it would take three days to produce using one factory. With three factories on the line, you would produce one tank every day.
Efficiency
Of course, this is just the base production value. There are many modifiers (usually positive) that alter production value. Chief among them is production efficiency. Production efficiency is a measure of how good factories are at producing something. When starting a new production line, the base production efficiency is 10%.
Hearts of Iron 4 Production Efficiency
If you often modify what is being produced or change it all together, factories on that line will have a low production efficiency. Conversely, by producing the same thing over a long period, the factories on that line will gain production efficiency. Certain techs increase the production efficiency cap and reduce the penalty for switching production.
Other factors can also influence your production including output, techs, advisors, national spirits, laws, etc.
Refitting
Hearts of Iron 4 Production screen
Recycling is good! Why let old equipment sit and gather rust in a depot somewhere when you can have it refitted into something useful!
Old variants of tanks and aircraft can be refit into a newer, modified version. For example, if you are producing Panzer IIs (light armor) and you unlock engine upgrades in the tech tree, you can convert the old Panzer II into Panzer II A’s. This comes with the benefit of lower resource costs and faster production time.
However, you couldn’t convert the old Panzer II into, say, Tigers because Tigers are considered heavy armor which is a different equipment type in the game.
If you need numbers, you can keep older equipment in service alongside the newly produced upgraded variant. Just make sure the obsolete equipment variant is NOT ticked on the decommissioned tab.
Resources
Hearts of Iron 4 here Italy is lacking resources
Unlike constructing buildings, production actually requires resources. There are 6 basic resources in the game:
steel
tungsten
chromium
aluminum
rubber
oil.
These resources cannot be ‘stockpiled’ as in previous Hearts of Iron games. You must control territory that has them, trade for them, or synthesize them.
Steel
Steel is by far the most common resource in the game. However, it is also the most used resource in the game. Almost everything from infantry kits to tanks to ships needs steel. Most of the major countries like Germany, the UK, and the Soviet Union have an abundance of steel so it isn’t normally a problem. Other majors like Italy and Japan may need to import it though.
Tungsten
Tungsten is a hard metal that is needed to produce artillery, anti-tank guns, and tanks. Because of this and it’s a relative rarity when compared to steel, it is a vital resource and will play an important part in most games.
Iberia, especially Portugal, has large quantities of tungsten.
Chromium
Chromium is not as common as steel in the game. Luckily it is not as commonly used for production. Only large ships like battleships and carriers and high-level tanks need chromium.
There is an abundance of chromium deposits in western Anatolia and the Balkans in the game.
Rubber
Rubber is needed to produce all aircraft as well as wheeled vehicles like half-tracks and trucks, thus it is of critical importance. It is found almost exclusively in the southwest Pacific islands which gives western Allied countries like the UK, France, and the Netherlands a significant advantage.
Oil
Oil is not used to actually produce anything. Instead, it is used exclusively to convert into fuel to be used by aircraft, ships, and land vehicles. It is, therefore, perhaps the single most important resource in the game. Without oil, countries cannot operate a modern and effective military.
Rubber and oil are different from the other resources in the game in that they are the only ones that can be synthesized.
Technology
Hearts of Iron 4 Soviet Union’s Focus tree
Each country in Hearts of Iron 4 begins the game with 3-4 research slots. You can usually add 1 or 2 more by completing certain focuses. Clicking on the ‘research’ tab at the top of your screen will allow you to browse through the different tech trees and choose what to research next.
When you finish researching a new technology, a popup will come up on the screen showing you what you have unlocked. If it is a stat upgrade, it will have an impact immediately. However, if it is a new piece of equipment, you will still need to produce it.
Design Companies
Each country has several design companies (some historic, some generic) that have an impact on research. Each company provides a boost to research speed as well as certain stat boosts for the relevant equipment item.
Hearts of Iron 4 France Tank Designer
For example, when playing as France, you can choose between five different tank designers. All five provide a +15% boost to research speed plus various other bonuses such as increased armor, speed, soft attack, etc.
Only one design company can be active at a time so you will have to decide what your priority is. To get the bonuses the design company must be in place before you finish researching a tech but not before you begin to research it. This means that as long as there is still at least one day remaining to completion for a tech, you can still add a design company to get the stat bonuses.
Design companies can be found by clicking your country’s flag at the top-left corner of the screen and are added using political power. More on that later.
High-Priority Techs
Hearts of Iron 4 important tech
Each tech in the game has a year associated with it. For example, improved machine tools is considered a 1937 tech. Researching ‘ahead of time’ will result in a research speed penalty. Generally speaking, it is better to research techs ‘on time’ to avoid this penalty.
However, some techs are so crucial that they should be researched ahead of time. Techs like electrical engineering and computing machines allow you to research things faster so they are usually a top priority tech.
Industrial techs like concentrated or dispersed industry, machine tools, and construction are all very important to your economy and thus usually worth it to research ahead of time.
Finally, it is important to consider build time when thinking about when to research techs for aircraft, tanks, and especially ships.
If your strategy calls for, say, 6 divisions worth of 1940 tanks by 1939, then you probably need to have finished researching the tech by the end of 1938. (This is because once researched, you will need time to produce them in your factories).
Pro-Tip: Tech Juggling
One advanced strategy players use to research critical techs faster is tech juggling. Tech juggling works by deliberately leaving one of your research slots empty for up to 30 days, then using that ‘stored’ research on another tech.
For example, let’s say I wanted to research electrical engineering as quickly as possible. I would begin researching it in slot A while letting slot B sit empty for 30 days accumulating ‘bonus research.’ After 30 days have passed, I move electrical engineering from slot A to slot B and suddenly it has 30 more days of progress towards completion. You can then let slot A sit empty to generate 30 days of bonus research and switch back and forth.
As stated, this allows you to research crucial techs as fast as possible in the game. It does however have downsides. You are using two slots for one tech which means one fewer tech overall. Therefore it is advised to use this tactic sparingly. Losing one tech for the gain of getting another more important tech faster is only worth it in select cases.
Politics
In the final subsection of this tutorial, I will cover politics. Politics in Hearts of Iron 4 includes choosing laws, decisions, and focuses and appointing advisors. These can be found by clicking on your country’s flag at the top left of the screen. Decisions are accessed by clicking the ‘decisions’ tab also found on the top-left side of the screen.
The ‘currency’ or mana used for most political moves is called political power or ‘pp’ in the game.
Advisors
Advisors are your cabinet members and military high command. These people are ‘bought’ using pp and provide a wide array of bonuses from increased political power generation to construction buffs or experience gains for your armed forces.
Some advisors are only unlocked after completing certain focuses or changing your country’s ideology so check back if you think there was a new candidate added to the pool.
Laws
Hearts of Iron 4 Law Screen
Laws in Hearts of Iron 4 deal with things like conscription, economic mobilization, foreign trade, etc. Changing laws usually costs 150 pp.
Most laws provide bonuses as well as drawbacks. For example, you could increase your conscription law to a very high rate to get more manpower available for your armed forces, but this would come at the expense of your economic output simulating men leaving their jobs for the army.
Some laws are only available if certain conditions are met like having a communist or fascist government, not being restricted by treaties, being at war, etc.
Decisions
Hearts of Iron 4 Decisions
Decisions cost less than laws or advisors usually 50 pp. They have a smaller effect, however. Additionally, most of them are conditional requiring certain triggers to be available. For example, you can’t activate propaganda or sell war bonds unless you are at war. Many countries have unique decisions, some activated by focuses so it’s worth checking back often to see what is available.
Focuses
Your country’s focus tree can be found by clicking the flag in the top-left of the screen and then clicking on the ‘select focus’ button next to your leader’s portrait.
By now, most countries have unique focus trees. Focuses offer a wide range of bonuses from tech speed increases to free factories and infrastructure. Focuses are also a vehicle (but not the only way) for countries to engage with one another diplomatically, offering non-aggression pacts, faction alliances, or even war ultimatums and declarations.
Focuses usually take 35-70 days to complete and cost 1 pp each day. Some focuses are mutually exclusive so choose your country’s path carefully!
Conclusion
This guide has taken you through the basics of economy in Hearts of Iron 4. Economy is of critical importance in HOI4. Although the game has taken steps away from WW2 realism, it is still a game set during the WW2 period. As such, the war is a war of economies. The stronger economy always wins. Ignore it at your own peril.
Here you find the Hearts of Iron 4 part 2: Military tutorial
Recently, I started playing HOI4 again. After lengthy absences, I often return to the game for some intensive play. I purchased the most recent DLC (No Step Back) for $20. This got me thinking. Was HOI4 worth it, considering the total price of the game with all the DLCs? That price, by the way, is $155!
The short answer isyes. For the more extended version, read below.
No Step Back!
Let’s start with the most recent DLC/patch, No Step Back (NSB). NSB provides new focus trees for the Soviet Union the Baltic countries, and a Poland rework. However, many fans were upset that the game studio did not include Finland here. Along with the new focus trees, NSB introduced a new logistics system, a tank designer, changes to the width meta, and a reorganization of the tech tree.
HOI 4 Logistics System
The Logistics system is by far the most significant change to the base game. Players now have more control over the supply of their forces. Players need to construct railways, supply hubs, and ports. Even temporary floating ports like Mulberry Harbor can be built. They also need to ensure that there are enough trains and trucks to move supplies to the front where they are required.
Admittedly, the new logistics system is intimidating at first. There are many moving parts to consider, and the tooltips don’t provide much clarity. However, once you learn the basics, it is actually very straightforward.
Increased player agency, as long as it doesn’t introduce tedium, is always a win in my book.
Tank Designer
HOI 4 Tank Designer screenshot
The tank designer is also an excellent addition. Similar to the ship designer that was added in Man the Guns, the tank designer allows the player to create custom-designed tanks.
These can range from small under-gunned tankettes with cheap, riveted armor to massive cast-armored behemoths that would rival the Maus.
Once again, increased player agency and immersion without tedium is a bonus.
To accommodate for the addition of the tank designer, the tech tree has been changed.
Doctrines have been removed from the tech tree and are now unlocked via army, air, or naval experience. This is another welcome change as I always felt like I was falling behind in tech before. Now it seems more manageable.
It is also more realistic. When it comes to battlefield doctrine, countries at war should have a marked advantage over those at peace. There is no substitute for actual battle experience.
Players can now also tailor their armed forces even more to their liking with the addition of spirits and preferred tactics. These spirits also cost experience, but they allow you to choose various bonuses for your military. With these additions, I actually felt like the supreme commander of my forces.
Another massive change is combat width. Whereas before, combat width for any tile was always 80, it is now based on the terrain of the tile on which you are fighting. For example, mountains have the smallest width at 75, and urban tiles have the largest at 96. (This is to simulate narrow mountain passes that limit available fighting space and the verticality of cities that increase it). Having different frontages for different terrain types eliminates the old meta of 20 or 40-width divisions.
Now there is no meta. Players will have to analyze their situations based on their country, likely fighting terrain, and industrial potential. This adds to replayability and allows for experimentation.
Finally, more focus trees were added. The Soviet Union and Poland got reworks while the Baltic countries got new ones. These have the, by now standard, various alternate history political paths players should be familiar with.
With each passing DLC, these focus trees have become increasingly complex. Personally, I prefer a smaller ‘cleaner’ tree-like, say Germany’s, but many players enjoy the more giant, more convoluted trees.
Other DLCs
There are a total of 7 major DLCs for Hearts of Iron 4. I have already covered the most recent NSB. Below is a list of the others in order of quality.
No Step Back (NSB)
By far the best DLC for previously mentioned reasons.
Man the Guns (MtG)
Man the Guns focuses on naval combat. It added the ship designer, which allows you to build custom-designed ships for your navy. This feature is very nice to have, and I can’t imagine going back to the vanilla game without it.
It also adds the ability to route your ocean-bound convoys manually. This is especially useful when playing as the Allies, as it allows you to ensure your convoys move through the safest possible sea zones where you have air cover.
MtG also adds focus trees to the USA, Mexico, and the Netherlands.
Waking the Tiger (WtT)
Waking the Tiger provides focus trees for Japan, Nationalist China, Communist China, and the Chinese warlord countries.
It also has a reworked tree for Germany, which includes alternate historical paths like the return of the Kaiser.
There are also some minor additions like adding field marshals to the chain of command and the ability to send air volunteers to other nations at war.
La Resistance (LaR)
HOI 4 Espionage System
The focus of this DLC is espionage. Espionage is a bit hit or miss in HoI4. Depending on the country you play, it could be central to your playthrough or not touched at all.
For example, a Free France player might have an excellent time building up and supporting resistance cells in occupied France waiting for D-Day, but for minor nations, there isn’t much use.
LaR adds focus trees for France, Spain, and Portugal. Spain has trees for all of the potential civil war factions, and France has its base tree plus two post-capitulation trees for Vichy and Free France.
Overall, it’s a valuable add-on, although probably not worth it for the regular price of $20.
Together for Victory (TfV)
TfV provides focus trees for the British Commonwealth countries of Canada, Australia, New Zealand, South Africa, and the British Raj. Each of these trees gives an option to stay loyal to Britain or try to break away and become independent.
It also improves the lend-lease mechanic so that you can request specific equipment from your allies.
Finally, it added the autonomy system, which deepened gameplay interactions with puppet nations.
Death or Dishonor (DoD)
DoD gives a focus tree to Hungary and Czechoslovakia. It also added trees for Yugoslavia and Romania, but those trees have been reworked again in subsequent DLCs.
DoD also added some more depth with production licenses. For me, at least, this was something I have not gotten much use out of.
Battle for the Bosphorus (BftB)
BftB added three new focus trees for Greece, Bulgaria, and Turkey. The same standard multi-path political direction is here for each country, although it has to be said that these trees are some of the most ‘out there’ as far as alternate history is concerned.
The restoration of old empires like the Ottoman and even Byzantine just doesn’t make sense in a WW2 game, in my opinion.
Bulgaria also has the opportunity to not only create a massive empire but to have ‘cores’ on it as well. These trees really unbalance the game as minor powers such as these have no business creating these massive (and with cores apparently culturally homogenous) empires.
The game might as well give every country the ability to do so, which is just silly and defeats the whole purpose of the coring mechanic anyway.
That’s it. There are no other game mechanics added.
To put it short, if you don’t have a personal interest in playing as Greece, Turkey, or Bulgaria, there really is no need to buy this DLC.
Mods
Hearts of Iron 4 has a huge modding community. There are multiple high-quality mods that give the game even more replayability. Below I will highlight a few of the more popular ones. All of the mods listed here are easy to download and install via the steam workshop.
Kaiserreich
Kaiserreich is an alternate history mod that puts you in a world in which the Central Powers rather than the Entente prevailed in the First World War.
It is packed with new ideologies, a new political system, and more than 100 new focus trees. If you are someone who enjoys Hearts of Iron 4’s alternate history paths, this is definitely the mod for you.
Road to ‘56
Road to ’56 is a mod that extends the ending date of the game (usually 1948) and takes it to 1956. It includes new alternate history focus trees for many of the most popular countries in the game.
Extending the game past 1948 gives players more time to enjoy the building up of their chosen country and potentially allows for more of a ‘Cold War’ experience after the main clash and peace conference.
Black Ice
If alternate history is not your thing and you are a stickler for historical accuracy, then Black Ice is the mod for you. Black Ice is historically accurate and adds much greater detail than vanilla HOI4.
There are hundreds of techs to research, and production is much less abstracted. Perfect for those who enjoy the minute details of planning and organization.
Old World Blues
Finally, if you are tired of WW2 in any form, alternate history or not, there is Old World Blues. OWB completely changes the game set to that of the widespread Obsidian game Fallout: New Vegas. Battle for control of the Strip and Hoover Dam as different factions, including the NCR, Caesar’s Legion, Mr. House, the Great Khans, and many others.
Hearts of Iron 4 gameplay is set in New Vegas lore. What’s not to love?
Problems
So far, I have given a mostly rosy depiction of the game. With the exception of a few unspectacular and overpriced DLCs, I haven’t had much negative to say about the game.
In the interest of remaining objective, I admit that the game is not without flaws. I will list some of the more egregious ones here.
AI Performance
Would it be a Paradox game if people weren’t critical of the AI’s performance? No, it would not. Hearts of Iron 4 is, unfortunately, no different in this regard. While it must be admitted that the AI is better than it was in Hearts of Iron 3, it is still not quite up to snuff.
problematic AI, here playing Italy
Part of the problem is that Paradox keeps designing these great systems but doesn’t or isn’t able to program the AI to use them. The AI will consistently create poor-quality divisions, tanks, and ships. I’m not entirely sure the AI knows how to use the logistics system either.
In my last campaign, Dozens of Allied British and French divisions swamped the Iraqi desert (The UK had gone down the aggressive part of its focus tree to seize the Middle Eastern oil fields) only to sit there out of supply and useless. Even worse, the French left the Maginot line completely undefended, and I, as Germany, literally just walked right in.
Things like this certainly don’t happen every game, but it’s enough to ruin a playthrough. (Imagine how disappointed I was to have spent hours designing and building the perfect Wehrmacht to crush the Allies, only to march straight to Paris unopposed).
The AI also sets up its chain of command in a bizarre and inefficient way. Italy will have maybe four divisions under its best commander Giovanni Messe while having around ten other ‘armies’ with 3 to 4 divisions, each commanded by low-skill generals or no one at all.
PC Performance
Hearts of Iron 4 has a division spamming problem. Due to how the game handles manpower, countries are able to man and equip enormously large armies. To put this in context, during the actual war, the USA only fielded around 90 divisions, not counting the Marine Corps. In HOI4, they can have 400+ by 1942.
When you multiply this by every country, you get a game with an insane amount of divisions running around. This absolutely wreaks havoc on PC performance. It is often so bad that players on mid-tier systems will quit games by 1941-42 because the game becomes too laggy to enjoy.
Multiplayer Hackers
This is a problem that has plagued Hearts of Iron 4 since its release. Hackers entering multiplayer lobbies and kicking players, messing with the game files (giving Poland say 900 civ factories, for example), and just generally harassing players is something that still happens with alarming frequency.
This problem has been brought to Paradox’s attention many times, but they have yet to come up with a solution.
Conclusion
Hearts of Iron 4 is not a perfect game (An ideal game might not even exist).
Nevertheless, it is an excellent game. With around 42,000 players playing at any given time, it is hard to argue with the game’s popularity.
HOI4 is not a cheap game, also. $155 for the game and all of the significant content DLCs is quite steep. However, it is a game that still provides unrivaled value.
I, for example, have 868 hours logged on steam for HOI4. (This does not even count the countless hours I have spent “offline” pouring over the forums, crunching numbers for economic planning, and considering new strategies).
In cold financial terms, that comes to 18 cents per hour of entertainment. I think many people would be hard-pressed to find a better entertainment value than that. So is Hearts of Iron 4 worth it? Absolutely.